Have you ever stood back to admire a beautiful piece of furniture, only to catch sight of an unsightly dent or crack that disrupts its charm? You’re not alone! Many of us have experienced that sinking feeling when our favorite wooden pieces show signs of wear and tear. Whether it’s a cherished heirloom or a DIY project gone slightly awry, the right wood filler can turn that disappointment into satisfaction. Finding the best wood filler can make all the difference, transforming damaged surfaces into smooth, pristine canvases that invite admiration.
In this guide, we’ll dive into the world of wood fillers, helping you navigate through various options to find the perfect match for your needs. From repairing old furniture to tackling new projects around the house, understanding what makes a top-quality wood filler will empower you to tackle any restoration task with confidence. With our carefully curated reviews and buying tips, you’ll be equipped to restore not just wood, but also the beauty and integrity of your favorite pieces. Let’s get started on turning those imperfections into opportunities for enhancement!
We will discuss the best wood filler further down, but for now, consider checking out these related items on Amazon:


Last update on 2025-06-19 / Affiliate links / #CommissionsEarned / Images from Amazon Product Advertising API
Discovering the Best Wood Filler
Picture this: you’ve just finished a charming woodworking project, perhaps a rustic coffee table or a unique bookshelf, but upon closer inspection, you spot a few unsightly cracks or holes. It can feel disheartening, but before you sigh in defeat, let me introduce you to the magic of wood fillers. These handy solutions are here to rescue your creations, enhancing their beauty and longevity. Choosing the best wood filler can make all the difference in achieving a flawless finish that is both aesthetically pleasing and durable.
The world of wood fillers can be overwhelming, with countless brands and types vying for your attention. From solvent-based to water-based options, each product has its unique benefits, which can cater to various woodworking needs. Did you know that according to the Home Improvement Research Institute, nearly 70% of DIY enthusiasts consider quality products essential for their home projects? This statistic underscores the importance of investing time in selecting the best wood filler, as it is not just a quick fix but a foundational element for a successful project.
When you think of woodworking, you might not immediately consider the importance of surface preparation and finishing touches, but that’s where wood fillers shine. The best wood filler does more than just fill gaps; it can also help you achieve a smooth and even surface that takes paint or stain beautifully. With a little research and experimentation, you can find the product that suits your specific project needs, whether you’re working with hardwood, softwood, or engineered wood.
As you embark on your woodworking journey, remember that the right wood filler can not only enhance the appearance of your projects but also extend their life. So, grab a few samples of the best wood filler options, try them out, and watch as your once imperfect surfaces transform into stunning works of art. After all, the joy of woodworking lies not only in its challenges but also in the satisfaction of seeing your vision come to life with perfect precision.
5 Best Wood Filler
1. Elmer’s E849 One Wood Filler
You were replacing the old wood paneling in your living room when you stumbled upon a hole that had long been hidden beneath layers of paint. Frustrated, you recalled hearing about Elmer’s E849 One Wood Filler from a friend. As you opened the container, the smooth, creamy consistency caught your eye, making it easy to apply with just a putty knife. Within moments, you were thrilled to see how easily it filled the gap, and the fast-drying feature meant you could sand it down and paint over it all in one afternoon.
The best part came after you painted over the patch; the wood filler blended seamlessly with the rest of the paneling. It felt like a little triumph each time you walked past that newly revitalized spot in your home. You learned that a good wood filler can bring life back to tired wood, and Elmer’s became your go-to for all future projects. It was more than just filling a hole—it was restoring a piece of your home’s history.
2. Minwax 42400000 Wood Filler
You recently decided to tackle refinishing your family heirloom dining table, and as you stripped away the old varnish, you were taken aback by a few scratches and dents that had accumulated over the years. That’s when you remembered the Minwax Wood Filler, which you had seen at the hardware store. It turned out to be a game-changer! The ease with which you mixed it and applied it to the damaged areas felt almost therapeutic. The thick texture allowed you to sculpt and shape it just right, restoring pride to your beloved table.
Once dry, you sanded it down and couldn’t believe your eyes. The filler not only looked fantastic but also offered a sturdy foundation that held up brilliantly under the new stain. As the table regained its beauty, you felt a sense of accomplishment. This wasn’t just about fixing furniture; it was about keeping family memories alive and kicking for generations to come.
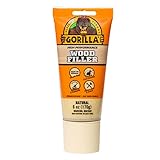
3. Gorilla Wood Filler
On a rainy Sunday afternoon, you found yourself staring at that old wooden chair that had seen better days. You remembered how much you loved that chair for its comfort and character, and you weren’t ready to give up on it just yet. That’s when you decided to grab a tub of Gorilla Wood Filler, a product you had heard rave reviews about. Its thick, paste-like quality made it super easy to scoop up and apply right into the cracks and holes that had formed over time.
After allowing it to dry, you sanded it down, and to your delight, the filler painted incredibly well with the chair’s light stain. It became hard as a rock, adding strength where there had been weakness. With the final coat of varnish, the chair looked as good as new. Each time you sunk into it with a book in hand, you couldn’t help but smile at the fact that you had given it a second lease on life, thanks to Gorilla.
4. 3M Bondo Wood Filler
There was that moment of panic during your home renovation when you discovered extensive wood rot in the old window frames. You didn’t want to replace the whole thing, so you turned to 3M Bondo Wood Filler on the advice of a neighbor. Mixing it felt like a science experiment, as you combined the hardener with the filler, but once you got started, it was remarkably simple. You filled in the rotted areas like an artist creating a masterpiece, and it was incredibly satisfying to see the transformation unfold right before your eyes.
The magic happened when you sanded it down—it was as if the damage had never existed! The wood was strong and ready to withstand the elements, and the way it took paint was nothing short of impressive. After finishing your project, you sat back and admired your handiwork. You reveled in the fact that not only did you save the windows, but you also learned that a solid wood filler could resurrect a piece of your home’s charm with just a little effort.
5. DAP 00585 All-Purpose Wood Filler
Your kids had a way of turning your lovely wooden cabinets into art projects, with colorful scratches marking their little adventures. Feeling both exasperated and amused, you decided now was the time to take action. DAP All-Purpose Wood Filler quickly came to your rescue. Its smooth application process made it easy for you to glide it over the blemishes, filling out the imperfections and restoring the wood’s original beauty in no time.
Once it dried, you couldn’t believe how easy it was to sand down—bringing those cabinets back to life felt incredibly satisfying. You quickly painted over the patches, and they looked as good as new! Every time you opened those cabinets to find something for dinner, you felt a wave of relief. You realized that children’s art could be managed, and with DAP by your side, you not only maintained the charm of your home but also found a way to embrace the joyful chaos of family life.
Why Do People Need to Buy Wood Filler?
Whether you’re a seasoned DIY enthusiast or simply someone looking to spruce up your living space, wood filler is an essential tool that can help you achieve a polished finish. Imagine you’ve just purchased an antique wooden table that has some unsightly scratches and dents. Before you can showcase it in your home, treating those imperfections becomes a must. Wood filler is essential in restoring the beauty of wood surfaces, allowing you to breathe new life into your furniture and fixtures without breaking the bank.
When tackling home improvements, wood filler offers versatility that many other products can’t match. Picture your wooden deck needing a bit of love—perhaps it has cracks or nail holes from past installations. With the right wood filler, you can easily repair these issues and create a smooth surface that is both aesthetically pleasing and ready for whatever the weather throws its way. The best wood filler not only does the job well, it also saves you the hassle of costly replacements, making it a smart investment for any homeowner.
Using wood filler can also be a great opportunity to engage in creative projects. Think about your child’s school project: a model boat made from scrap wood that ends up with some gaps and rough edges. Instead of discarding it, a little wood filler can transform it into a cohesive masterpiece! It offers a chance to bond over DIY, teaching your kids about repair and creativity while building their confidence to work with tools.
Moreover, the satisfaction of completing a project with wood filler can’t be overstated. The feeling of accomplishment when you see repaired surfaces that look brand new is incredibly rewarding. Whether you’re fixing a simple hole or indulging in an ambitious restoration, the best wood filler equips you with the power to achieve professional-looking results right in your own home. So why wait? Investing in wood filler can elevate not only your home’s appeal but also your DIY skills.
Types of Wood Fillers: Which One is Right for You?
When it comes to wood fillers, not all products are created equal. Knowing the difference between the various types can dramatically affect your project outcomes. There are primarily three categories: latex-based, solvent-based, and epoxy fillers. Each type possesses unique characteristics that make them suitable for specific applications. For instance, latex-based fillers are ideal for small repairs and can be painted over easily. However, they may not hold up as well in areas subjected to high moisture.
On the other hand, solvent-based fillers are often more durable and can be used both indoors and outdoors. They’re particularly beneficial for large repairs and when you need to match the finish of your wood. But bear in mind, these fillers often have a stronger odor and may require more careful handling. Lastly, epoxy fillers are your go-to if you’re dealing with significant structural repairs. They can bond wood pieces together and fill deep voids, making them a fantastic option for rot repair.
For a practical scenario, imagine you’re restoring a family heirloom furniture piece. If it has small chips and dents, a latex-based filler may do the trick. Yet, if you’re repairing a wooden deck with visible gaps, a solvent-based filler can effectively withstand the elements while supporting the wood’s longevity.
Application Tips for a Flawless Finish
Applying wood filler might seem straightforward, but there are techniques that can elevate your results from mediocre to professional. First and foremost, surface preparation is critical. Ensure the area is clean, dry, and free from any old paint or dust. Sanding the area lightly can also help the filler adhere better and provide a more seamless finish.
Once the surface is ready, apply the wood filler with a putty knife at a slight angle. It’s important to apply enough pressure to push the filler into the cracks and holes effectively. For larger gaps, using a backer rod can provide additional support. After filling, remove any excess material before it dries, as this will save you from a tedious sanding session later on.
Real-world application can often vary based on project types. For example, when refinishing a piece of wooden furniture, applying the filler with a fine touch can minimize the need for sanding. In contrast, outdoor projects such as filling gaps on a wooden deck may benefit from a more generous application, ensuring a robust bond against the elements.
Common Mistakes to Avoid When Using Wood Filler
Even seasoned DIY enthusiasts can make mistakes when it comes to wood filler, and overcoming these can save you time and frustration. One of the most common pitfalls is overfilling. While it may seem logical to fill a hole completely, excess filler can lead to uneven surfaces, requiring more sanding than necessary. A good rule of thumb is to apply the filler slightly above the surface, allowing for shrinkage as it dries.
Another frequent error is not allowing adequate drying time. Every wood filler has different drying times, and rushing this step can result in cracks and an unsatisfactory finish. Always refer to the manufacturer’s instructions, and if you’re in doubt, give it a bit more time. Patience is key to achieving that flawless finish.
Lastly, choosing the wrong type or color of wood filler can be a costly mistake. For instance, using a light-colored filler on dark wood can leave an obvious mark that takes away from the final outcome. It’s essential to test a small area first or consult with your local hardware expert. In a real-world setting, this could mean the difference between a quick, impressive repair and a time-consuming repainting project.
Innovative Uses for Wood Filler Beyond Repairs
While you might think of wood filler as a simple solution for filling cracks and holes, its applications can extend far beyond that. One innovative use is for creating custom wood finishes. By mixing dyes or pigments into the filler, you can create a blended look that can enhance the wood grain, providing a unique finish. This is particularly useful for upcycling projects where you want a one-of-a-kind appearance.
Another creative application is in artistic endeavors. Wood filler can be sculpted to create decorative designs or fill in intricate inlays. A DIY enthusiast could use this technique to add character to a standard piece of furniture, transforming it into a statement item. Imagine revitalizing an old cabinet by giving it a unique, artistic flair. Using wood filler in this way not only enhances aesthetics but also demonstrates your personal touch.
Lastly, wood filler can be cleverly used to improve the containment of other materials. For instance, if you’re building something that involves joints, using wood filler as a bonding agent can create an undeniably sturdy construction. This practical approach is especially helpful for furniture building, ensuring that joints are tight and secure, preventing any wobble or instability as the piece gets regular use.
Best Wood Filler: Your Ultimate Buying Guide
When it comes to home improvement projects, having the right materials on hand can make all the difference. One such material that often flies under the radar is wood filler. Whether you’re patching up a hole, filling cracks, or refinishing furniture, using the best wood filler can help you achieve a seamless finish and extend the life of your projects. With so many options available, how do you choose the right one for your needs? Don’t worry; I’m here to guide you through the essential factors to consider when selecting wood filler. Let’s dive in!
1. Type of Wood Filler
Choosing the right type of wood filler is crucial. There are mainly two types: water-based and solvent-based. Water-based fillers are easier to clean, have low odor, and dry quickly, making them a great choice for interior projects. Solvent-based fillers, on the other hand, tend to be more durable and are suitable for exterior applications where weather resistance is needed. Think about your specific project and whether it’s going to be indoors or outdoors.
It’s also worth considering specialty fillers designed for specific applications. For example, if you’re working with a large hole, a heavy-duty filler might be the best wood filler for your situation. If you are looking to stain or paint over the fill, opt for a filler that matches the characteristics of the surrounding wood. This consideration will ensure a smoother finish once the job is completed.
2. Drying Time
Ah, drying time—an important factor that can either make or break your project timeline. Some fillers dry in just a few minutes, while others may take hours to set properly. If you’re a DIYer who likes to get things done quickly, you might lean towards a fast-drying wood filler. These are especially useful for quick repairs or if you’re in a rush to complete a project.
However, faster isn’t always better. Keep in mind that some slow-drying fillers may allow more time for adjustments before they harden completely. If you’re a beginner or aren’t entirely sure about your application, a longer drying time could give you more control to fine-tune your work. It’s about finding the right balance that suits your pace and project needs.
3. Sandability and Finish
One of the most satisfying aspects of working with wood filler is the flawless finish it can provide when done right. You’ll want to pay attention to how easy the filler is to sand down. Some fillers sand down beautifully, while others can be somewhat gritty and stubborn. You definitely want a filler that can be sanded to match the surrounding wood seamlessly.
Moreover, think about the type of finish you’re going for. Will the wood be stained or painted? The best wood filler for your project should accept stains and paints uniformly. Some fillers come in different colors, which can also save a lot of time when it comes to matching the wood. Checking reviews and product descriptions can help you find those fillers that will give you the best outcome when you’re finishing your project.
4. Color Matching
Color matching is another important factor to consider when purchasing wood filler. You want it to blend in flawlessly with the wood you’re working on. Some fillers are available in a variety of shades to match different wood types, while others can be tinted or stained to achieve a perfect match.
If your project involves darker wood, be sure to choose a filler that can accommodate that. It might involve a bit of trial and error, especially if you’re using a water-based filler that may dry lighter than it appears when wet. Always test a small area first, and don’t be afraid to mix colors if you’re working with a specific shade. This little extra effort can yield a much more polished result, leaving your repairs nearly invisible.
5. Strength and Durability
You want your repairs to hold—no one likes the thought of having to redo work just a few weeks later. The strength and durability of the wood filler are essential, especially for high-traffic areas or outdoors where weather can impact performance. Look for fillers that are specifically labeled as “heavy-duty” or “structural” if you need something that can take a beating.
Also, consider the filler’s resistance to shrinkage. Some fillers may shrink as they dry, which can cause gaps in your repairs. By opting for a high-quality, durable filler, you can rest assured that your work will stand the test of time. It’s always worth checking product ratings and reviews to gauge the experiences of others who have used the filler in similar conditions.
6. Ease of Application
As with many home improvement tasks, the ease of application plays a big role in your satisfaction with the project. Some wood fillers come in a tub and can be applied directly with a putty knife, while others may require mixing or special tools for application. When you’re in the middle of a project, the last thing you want is to struggle with a complex application process.
If you’re an inexperienced DIYer, you might want to go for those easy-to-use fillers that can be applied directly without much fuss. Read instructions carefully, as some fillers may have different application methods. A little preparation can save you from headaches later on, allowing for a smoother, more enjoyable project experience.
7. Price and Value
Lastly, let’s talk about price. While it might be tempting to grab the cheapest option on the shelf, remember that you often get what you pay for. The best wood filler won’t always be the priciest; sometimes it’s all about finding a good balance between quality and cost. Investing a bit more in a reliable product can save you money and time in the long run by preventing repeated repairs.
Before making your purchase, do a little comparison shopping and consider the amount you get for the price. Sometimes larger tubs or kits can provide better value, especially for bigger projects. Always factor in your budget and weigh it against the quality and capabilities of the product you’re considering.
In conclusion, choosing the best wood filler involves understanding your project needs, the properties of different fillers, and how they’ll affect the finish of your work. By considering these seven key factors—type, drying time, sandability, color matching, strength, ease of application, and price—you’ll be well on your way to making an informed purchase. Happy filling, and may your woodwork projects be as flawless as you envision!
FAQs
What is wood filler and when should I use it?
Wood filler is a specialized substance designed to fill gaps, holes, and imperfections in wood surfaces. It’s particularly useful when you’re working on projects like furniture repairs, cabinetry, or finishing touches on woodwork. If you spot cracks, nail holes, or even larger voids in your wood, that’s your cue to reach for wood filler. It helps create a smooth and polished look, making your wood projects appear more professional.
When using wood filler, it’s best to apply it before sanding and finishing your project. This ensures that the filler blends seamlessly with the surrounding wood. You’ll be happy to know that wood fillers can also help in restoring older furniture and wooden fixtures, so don’t hesitate to use it whenever you feel the need for a little TLC on your wood pieces.
What’s the difference between wood filler and wood putty?
While both wood filler and wood putty serve similar purposes, they do have distinct differences. Wood filler is typically used for structural repairs and is made from a mix of wood fibers and adhesives. It’s ideal for use in projects where you’ll be sanding and finishing, as it can be painted or stained to match the surrounding wood. On the other hand, wood putty is usually oil-based and more flexible, making it better suited for small repairs or filling gaps in areas that require movement, like joints or cracks.
In practice, you’d choose wood filler for areas that will be painted or stained and need a solid, durable finish. If you’re working on an outdoor project or around moisture-prone areas, wood putty might be the right choice as it’s more resistant to the elements. Understanding these differences can help ensure your project turns out just as you envisioned!
Can I paint or stain over wood filler?
Absolutely, you can paint or stain over wood filler! This is one of the benefits of using a high-quality filler, as many brands are designed specifically to accept paint or stain. Just keep in mind that to achieve the best results, it’s essential to let the filler dry completely before applying any additional finishing layers. This ensures that the paint or stain adheres well and does not interfere with the curing process of the filler.
However, it’s a great idea to sand the area once the filler dries, as this will create a smooth surface that promotes a flawless application of your chosen finish. You might want to test a small area first to see how the wood filler takes the stain, as some fillers can absorb the color differently than the surrounding wood.
How long does wood filler take to dry?
The drying time for wood filler can vary depending on the type of filler you use and the conditions in which you’re working. Generally, water-based wood fillers can dry in about 30 minutes to an hour, while solvent-based fillers might take a bit longer, usually around 1 to 2 hours. Always check the manufacturer’s instructions, as they’ll provide the most accurate guidelines for the specific product you’re using.
While it can be tempting to rush the process, allowing the filler to dry completely before sanding or finishing will lead to better results. Patience is key here! If you’re working on a larger project, factor in this drying time so you can plan your next steps accordingly without feeling pressured.
Can I use wood filler on exterior projects?
Yes, you can use wood filler on exterior projects, but you need to be cautious about the type you choose. For outdoor applications, look for fillers specifically labeled as weather-resistant or suitable for exterior use. These products are formulated to withstand the elements and prevent deterioration due to moisture and temperature changes. Typically, epoxy-based fillers are also a good option for outdoor projects, as they offer added durability.
When applying wood filler to an exterior surface, it’s also a good idea to seal and finish the area afterward to enhance protection against weathering. A proper finish will not only improve the aesthetic but also prolong the life of your repair, keeping your outdoor wooden structures looking their best.
How do I remove dried wood filler?
Removing dried wood filler can seem daunting, but it’s easier than you might think! Start by using a putty knife or a scraper to gently lift off as much filler as possible. Be careful not to damage the surrounding wood surface as you work. If the filler proves stubborn and doesn’t come off easily, you can try using a heat gun to soften it. Just keep the heat source moving to avoid burning the wood.
In some cases, sanding can also be effective, especially if you’re working with a small amount of filler. Use a fine-grit sandpaper to gently sand down the area until you reach the desired smoothness or until the filler is removed. If you’re planning to reapply wood filler, make sure you clean the area thoroughly before starting anew, so you ensure a strong bond with your new filler.
What factors should I consider when choosing a wood filler?
When selecting a wood filler, a few key factors can make your decision easier. First, consider the type of project you’re working on: are you filling small holes, large gaps, or doing intricate repairs? Different wood fillers are formulated for particular uses, so choosing one that suits your needs is crucial. Also, think about whether you need a product that’s paintable, stainable, or suited for outdoor use, as this can greatly affect your project’s outcome.
Another important factor is the drying time and ease of application. Some wood fillers dry quickly but might require sanding sooner, while others offer longer working times with less urgency. Reading reviews and recommendations can also be helpful; other users’ experiences can give great insight into the product’s performance and quality. With the right filler in hand, your wood repair or project can go smooth as butter!
Conclusion
As we wrap up our exploration of the best wood filler options available, remember that every scratch, dent, or hole in your woodwork is an opportunity to create something beautiful. With the right wood filler in hand, you’re not just repairing; you’re revitalizing your spaces and adding your personal touch to every project. Embrace the journey of craftsmanship, knowing that your choice in wood filler will contribute to the masterpiece you’re building, be it a cherished piece of furniture or a stunning decor project.
So go ahead, trust in your abilities, and have fun with your woodworking adventures! You have the knowledge and tools needed to choose the best wood filler that suits your needs. Now it’s time to unleash your creativity, tackle those repairs head-on, and enjoy the satisfaction of transforming imperfections into perfection. You’ve got this, and your project is waiting just for you!